
You’d be surprised how a simple trick like hanging curtains from the ceiling can totally change the look and feel of any room. People love the drama and height that ceiling-mounted curtains bring. But here’s the kicker—there’s actually a method to doing it right, and botching it can make your space look awkward or even messy. Forget those old, stubby drapes that barely kiss your window! There are straightforward rules pros swear by, inspired by both clever design logic and even some Canadian climate quirks—hey, Toronto winters demand a cozy home, right?
Why Choose Ceiling-Mounted Curtains?
People don’t just hang curtains from the ceiling because it looks flashy. Ceiling-mounted curtains serve real functional and decorative purposes. First, they make any ceiling look higher—think of it as a visual cheat code. Even if you’re in an old walk-up in Toronto or something sleeker downtown, running that curtain rod up to the ceiling draws your eye upward and creates immediate drama. Designers say hanging rods at ceiling height can visually raise your walls by up to a foot, no renovation necessary!
This style can also be incredibly practical for people with oddly shaped windows or rooms with minimal wall space above the glass. Ever notice how condos sometimes come with these enormous floor-to-ceiling windows? It's nearly impossible to mount rods above those, but you can always hang from the ceiling, giving you shade, privacy, and a high-end look at the same time.
There’s another smart reason: climate control. Yep, certain heavy drapes hung from the ceiling help keep the heat in during nasty Canadian winters and the sun out on humid July afternoons. Blocking air drafts or sunlight at the very top of the wall is a detail heat-conscious homeowners or renters really appreciate.
And if you’re into flexible design, ceiling-mounts are also your friend. Want to divide open spaces, hide a cluttered corner, or add privacy to a shared bedroom? A ceiling track and a panel of fabric can carve out temporary rooms in a snap. You’ll spot this move in trendy Airbnbs or even Toronto’s startup offices because it works and looks sharp.
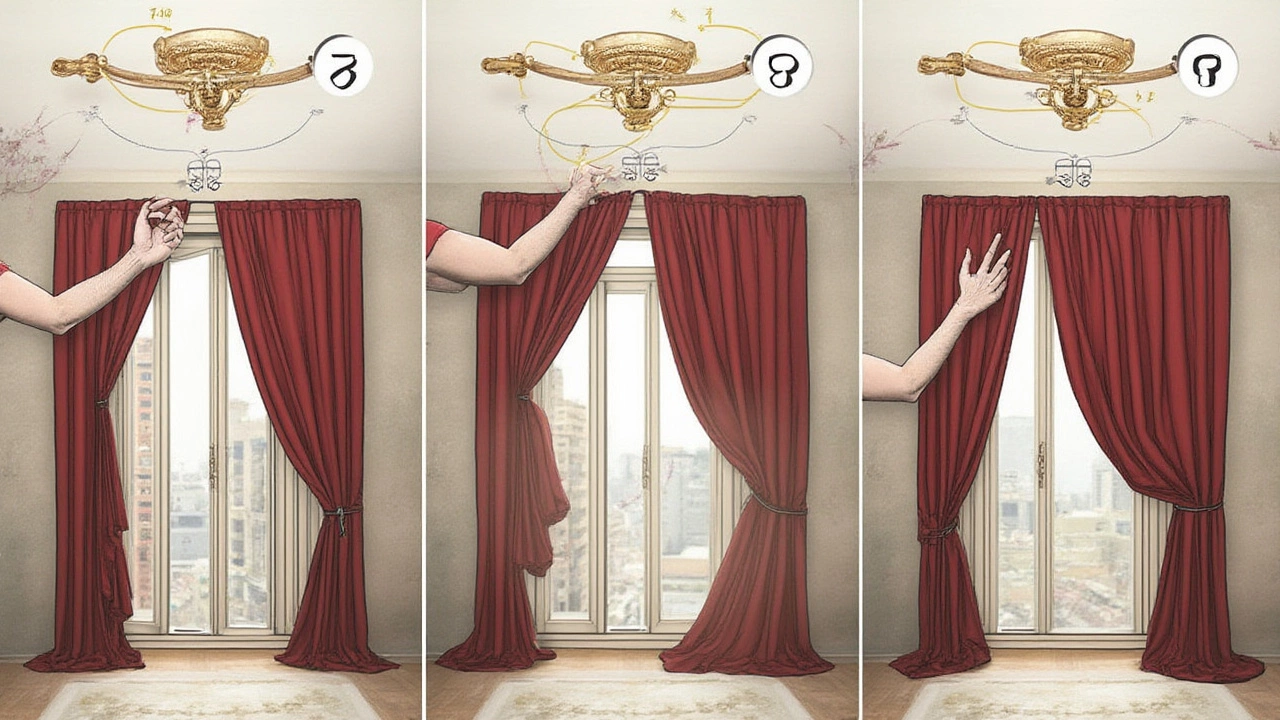
The Core Rule: Mount as Close to the Ceiling as Possible
Here’s the golden rule: Hang your curtains as close to the ceiling as possible—ideally about half an inch below. If you do that, you instantly create the illusion of taller ceilings and a grander space. That’s the mirror trick of interior design, and it works almost every time. Just make sure you leave enough space for the rod brackets and to allow curtains to glide back and forth without scraping the ceiling or getting stuck. For tight ceilings, a slim ceiling-mount bracket or curtain track does the trick. Skip chunky rods unless you’ve got super-high ceilings to play with.
Another detail: let your curtains drop all the way down so the fabric either just touches the floor or pools slightly for a luxurious look. Avoid leaving your curtains awkwardly hovering above the ground, unless you’re going for a crisp, ultra-modern vibe, or you’re concerned about pets and dust bunnies. Here’s the basic math designers use: measure from the ceiling down to the floor, subtract a half inch for clearance, and that’s your curtain length. Sounds simple but people mess this up all the time.
And don’t forget about curtain fullness. If your rod or track spans ten feet, don’t force ten feet of curtain across it—double or even triple it for that rippled, hotel-style look. For reference, a width ratio of 2:1 is the pro standard, meaning your curtain fabric should be twice as wide as your window or area. It’s these subtle tweaks that make a regular living room look like a professionally styled magazine spread.
There are exceptions. For rooms with crown molding or historical trim, you’ll want to respect the detail by hanging just below the molding rather than right on it. And if your ceiling is sloped, mount the track parallel to the floor, not the ceiling, to avoid uneven hems. These choices might sound subtle but trust me, they matter—the difference between a curtain job you brag about and one you quietly regret.

Materials and Hardware: What to Know Before You Drill
Let’s get into the nitty-gritty. The hardware you choose is just as important as where you place it. Ceiling-mount curtain rods and tracks come in different styles, but most people find tracks the easiest for low ceilings or tricky setups. A ceiling-mounted track system almost hugs the surface, so your drapes hang flush without a gap, blocking maximum light and nosy neighbors’ views.
If you’ve got heavy curtains or black-out panels, check your ceiling construction before you start drilling. In modern condos with concrete ceilings (Toronto folks, you know this pain), you’ll need a masonry bit and anchors made for concrete. In older homes or those with drywall ceilings, aim to hit a ceiling joist. If you can’t, special toggle bolts or anchors will stop your curtains from crashing down at 2 a.m.
Here’s another pro tip: measure—and mark!—your bracket or track placement with a level, not your eyeball. Ceilings in older homes aren’t always exactly level, and even a half-inch slope will look glaringly obvious once you hang long panels. Remember to factor in the curtain headings; grommet tops, pinch pleats, or rod-pocket curtains each hang a little differently. Double-check your distance from the wall to allow curtains to flow with ease and avoid bunching at one end.
Want stats? According to a Houzz UK survey in 2023, nearly 36% of homeowners choosing new window treatments picked ceiling-mount solutions over classic wall-mounts because they like the tailored, elongated look. And in colder climates like Canada, 71% cited "energy efficiency" as the reason for choosing full-drop, heavy curtains.
| Ceiling Type | Recommended Fastener | Notes |
|---|---|---|
| Concrete | Masonry anchors/Concrete screws | Requires hammer drill |
| Drywall | Toggle bolts | Best if joist not accessible |
| Wood Joist | Wood screws | Most secure |
Picking the Best Fabric and Style
Let’s talk fabrics and finishing touches. Not every drape will look (or behave) the way you want when it’s hanging from the ceiling. The biggest mistake? Choosing a material that’s too stiff or too flimsy. Lightweight sheers will give a dreamy, soft look, letting in loads of natural light but not much privacy. Velvet or heavyweight blackout panels, on the other hand, can look elegant and add plenty of warmth—perfect for long Canadian winters when you want your place to feel like a cocoon.
Patterns matter too. Vertical stripes are a no-brainer for making things look taller, while bold solids add a punchy, contemporary edge—very Scandi-cool if that’s your thing. For rental apartments (especially if you can’t drill), opt for temporary adhesive brackets or tension rod track systems. The fabric’s length and draping style can transform vibes from "bohemian backdrop" to "five-star hotel" overnight, just by swapping panels out seasonally.
One tip from home stagers: always steam or iron your panels before you hang them. Wrinkles kill the effect faster than you’d think, especially with all the light coming in at the top of the room. Even if you love a relaxed look, aim for soft folds, not harsh creases. If you want high drama, let the curtains pool two inches onto the floor. For everyday life and easy cleaning, a just-touching-the-floor finish is easier to live with, especially if you have pets, kids, or a vacuum that likes to munch on fabric.
Mixing and matching isn’t off-limits either. Layering sheer panels behind heavier drapes offers next-level flexibility. Friends will think you hired a decorator. Bonus: Swap out colors and textures when the seasons change, since ceiling-mounted tracks make it easy to exchange panels without awkward climbs up the step stool every few months.
DIY Tips and Common Mistakes to Avoid
You don’t need to be a pro to get ceiling-mounted curtains right, but you do need some patience—and, honestly, the willingness to measure twice. A checklist helps. Before firing up the drill, mark your ceiling carefully, double-check your measurements against your curtain’s heading and finished length, and always, always use a level as your final reference instead of just estimating by sight. Most mess-ups trace back to tiny slip-ups with math or lazy measuring.
Installer secret: ask a friend for help, especially if you’re working with long or heavy fabric. Trying to keep one end level while the other sags will guarantee a crooked result. And don’t ignore the hardware. Skimping on quality brackets or tracks sounds like savings—until they bend under the weight. Spend the extra few dollars to get hardware rated for your panel weight and width. Creaky or loose curtain tracks are a royal pain to fix after the fact.
If you’re not sure what’s behind your ceiling, grab an inexpensive stud finder. This cuts drilling mishaps in half, and you can avoid those tales of tragic holes in drywall and nicked electrical wires. For renters, check your lease before drilling. If all else fails, look for no-drill ceiling solutions or even use ceiling-mounted tension tracks which you can find online or at local hardware spots like Home Depot or Lee Valley.
Don’t forget the aftermath. Dust and debris from drilling can coat your curtains in a snap. Always install the hardware first, then hang your clean, pressed curtains. Trust me, vacuuming red velvet or pure white linen isn’t anyone’s idea of a fun afternoon.
People often stress about the perfect ceiling-mounted curtain setup, but when you break it down, it’s all about a solid plan, precise math, and a bit of style flair. The payoff? A room that feels bigger, warmer, and stylishly pulled together—just by getting your curtains as high as they'll go.


Nov 21 2025